
How I Hijacked FM Radio Using a Raspberry Pi Zero
Introduction
This guide shows how to set up PiFmAdv on a Raspberry Pi and broadcast FM radio using GPIO.
FM broadcasting may be illegal or regulated in your country. This demonstration is for educational and experimental purposes only. Keep transmission power low, range short, and avoid interfering with licensed stations. You are responsible for complying with local laws and regulations.
Requirements
- Raspberry Pi: Zero, or Zero 2 (used here: Raspberry Pi Zero 2 W)
- Jumper wire (one is enough for the antenna)
- PC/Laptop with any GNU/Linux OS (I use Arch, btw)
- USB adapter and microphone (optional, for mic input)
Setup PiFmAdv
First, install Raspberry Pi OS on your Pi. This guide skips OS installation—there are plenty of guides available.
Access your Raspberry Pi terminal. Here, SSH is used.
Install dependencies
sudo apt update -y && sudo apt install git libsndfile1-dev libsoxr-dev -yBuild PiFmAdv
git clone https://github.com/Miegl/PiFmAdv.git
cd PiFmAdv/src
make clean
make
Install locally
Rename and copy the binary to a local bin directory for easy access:
mkdir -p ~/.local/bin
cp pi_fm_adv ~/.local/bin/pifm
Add it to your PATH (based on your shell):
export PATH="$PATH:$HOME/.local/bin"Reload your shell or source the file.
Antenna Setup
Connect a jumper wire to GPIO4 on the Raspberry Pi. This wire acts as the FM antenna.
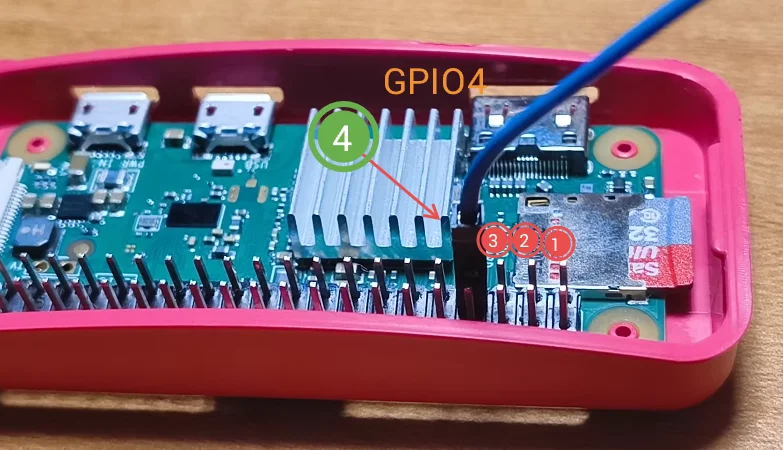
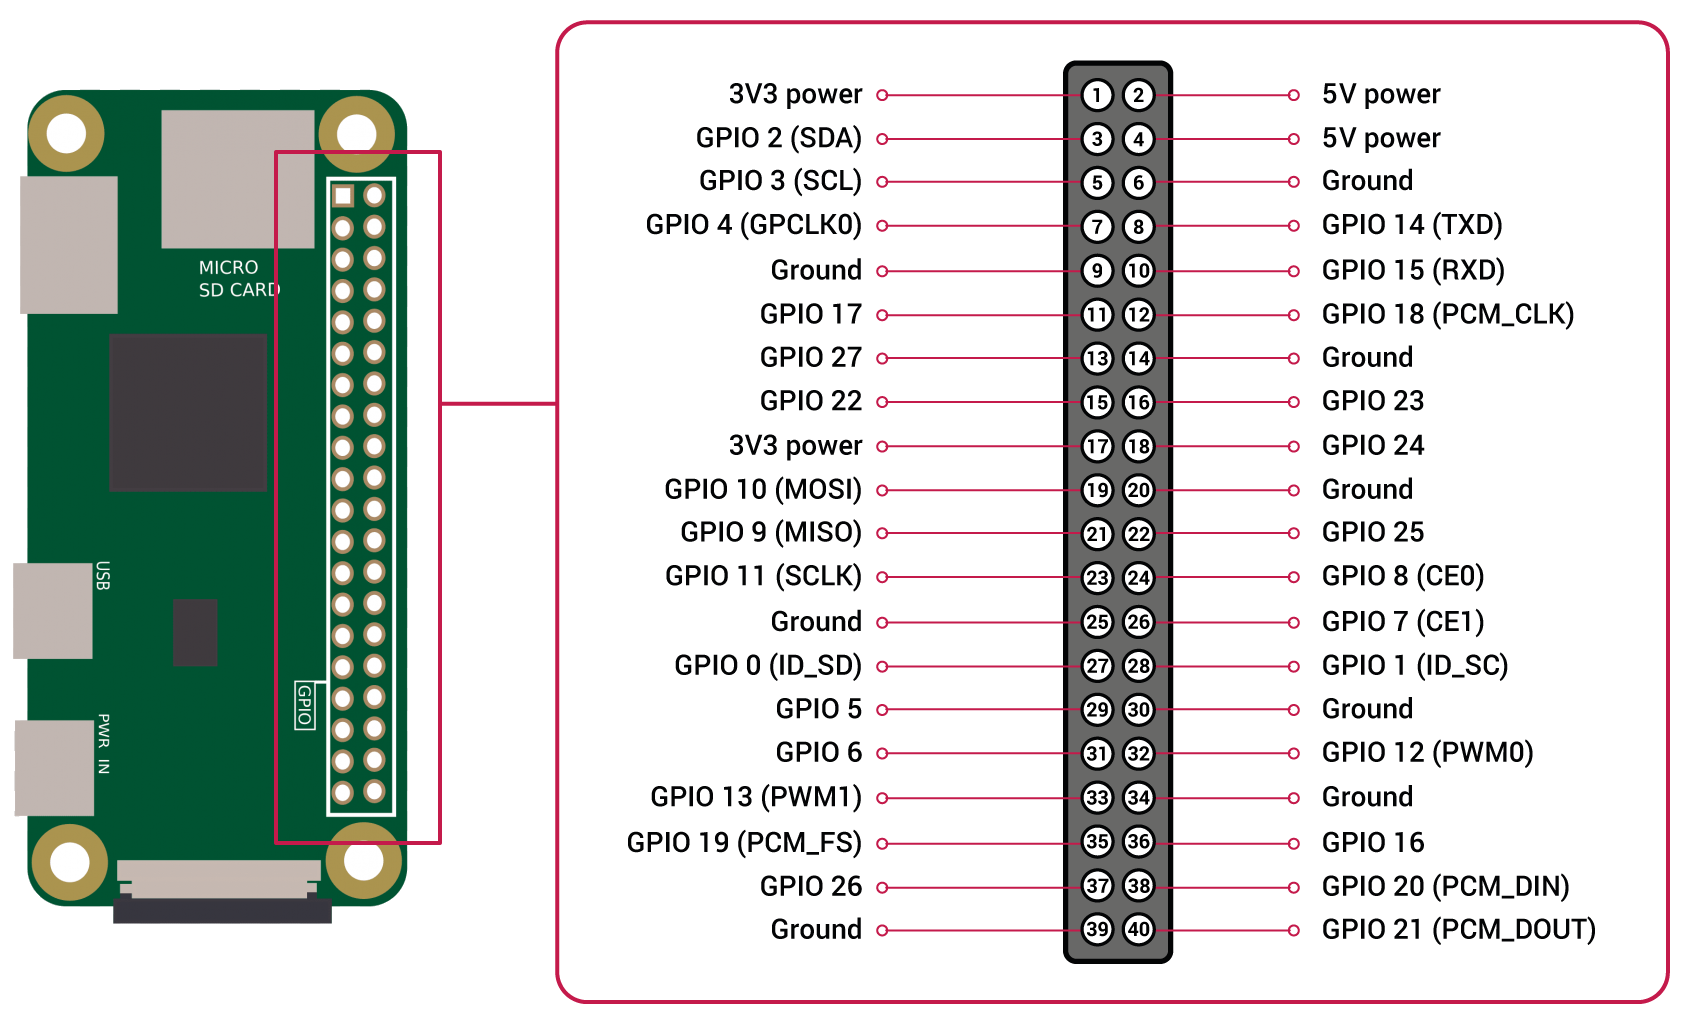
Use the pin diagram above to identify the correct pin.
Broadcasting radio signals
using an audio file
sudo pifm -f 103.2 --ps "DawnFM" --rt "SongName" -a "$HOME/Music/song.wav"Using a microphone
- Connect your microphone (USB dongle or USB mic).
- Find the microphone device ID:
arecord -lYou’ll see something like:
card 1: USB [USB Audio], device 0: USB Audio [USB Audio]That means:
card = 1
device = 0
So the mic ID becomes:
plughw:1,0Test the mic (important):
arecord -D plughw:1,0 -f S16_LE -r 22050 test.wav
aplay test.wav
If you hear your voice, the mic is set correctly.
- Broadcast live audio:
arecord -d 0 -c 1 -f S16_LE -r 22050 -t wav -D plughw:1,0 - | sudo pifm -f 103.2 --ps "DawnFM" --rt "Live Broadcast" -a -Replace plughw:1,0 with your mic’s actual card and device numbers.
Broadcasting MPD Music over FM
This part is for when your music is playing on another computer and you want the Raspberry Pi to rebroadcast it over FM.
MPD runs on your main machine, exposes an audio stream over HTTP, and the Pi simply listens to that stream and transmits it using PiFmAdv.
MPD configuration
Add this block to your mpd.conf:
music_directory "~/Music"
auto_update "yes"
bind_to_address "any"
port "6600"
restore_paused "yes"

audio_output {
    type "httpd"
    name "Radio Stream"
    encoder "flac"
    port "5555"
    bind_to_address "0.0.0.0"
    always_on "yes"
    mixer_type "software"
    tags "yes"
    format "44100:16:2"
}
This tells MPD to:
- keep playing even with no listeners
- expose a live audio stream on port
5555 - include track metadata
Restart MPD after editing:
systemctl --user restart mpdStreaming MPD into PiFmAdv
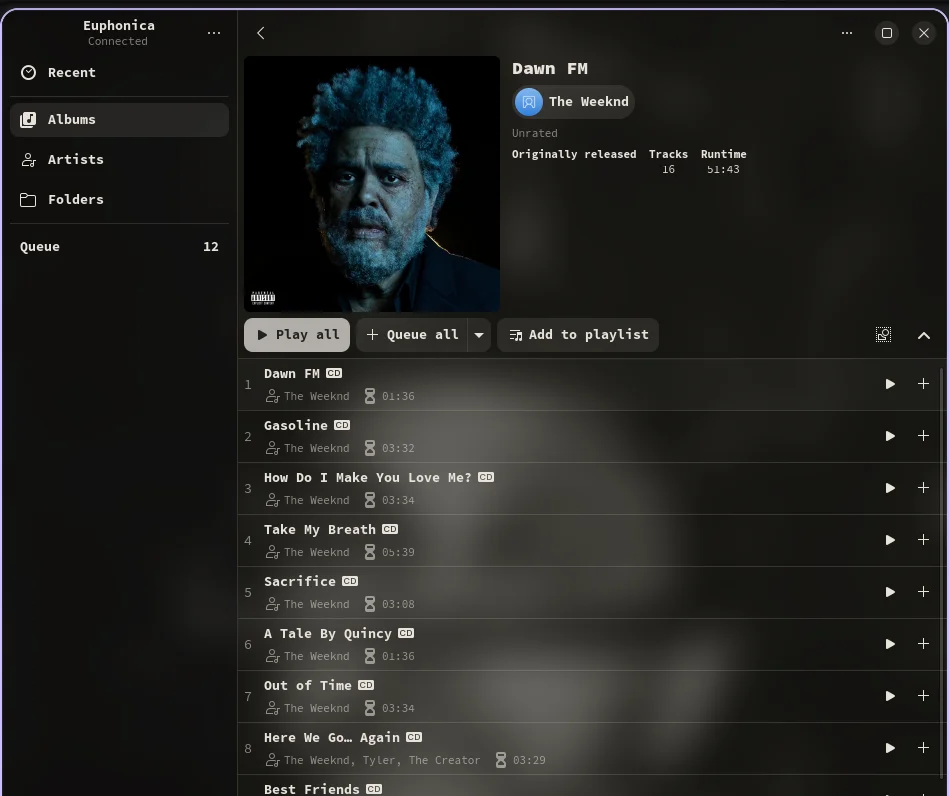
Now use your favorite music mpd client to play music here i am using euphonica
On the Raspberry Pi, connect to the MPD stream and broadcast it:
ffmpeg -re \
  -reconnect 1 -reconnect_streamed 1 -reconnect_delay_max 2 \
  -i http://192.168.1.75:5555 \
  -ac 2 -ar 44100 -f wav - \
| sudo pifm -f 103.2 --ps "DawnFM" --rt "Stereo Stream" -a -
What’s happening here, in plain terms:
- MPD sends audio over your network
ffmpegkeeps the stream smooth and converts it to WAV- PiFmAdv pushes it out over FM
As long as MPD is playing, your radio is live.